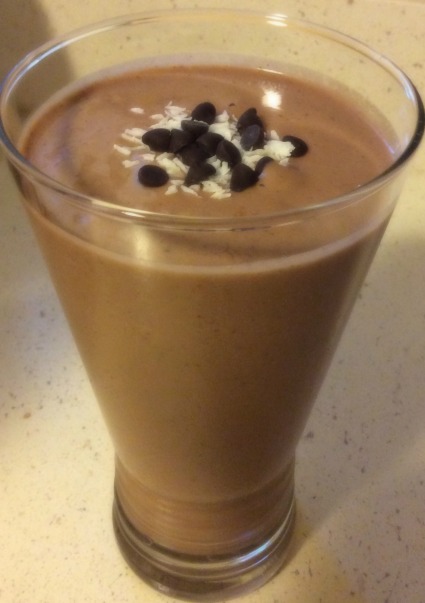
Creamy Chocolate-Banana Smoothie (Dairy-Free)

I have to say that smoothies are one of my all-time favorite foods. And this time of year just shouts “smoothies”—okay, let me just insert here that I will and do eat smoothies ANY time of the year, but summer is an especially wonderful time for these delicious cold treats. Warm weather; ripe, plump produce around and about; it just…goes together. Needless to say, I’ve been slurping up some kind of smoothie almost every day over the last month and there’s no sign of letting up any time soon. (My poor blender doesn’t stand a chance.)

I wanted to share with you one of my favorite combinations so far.

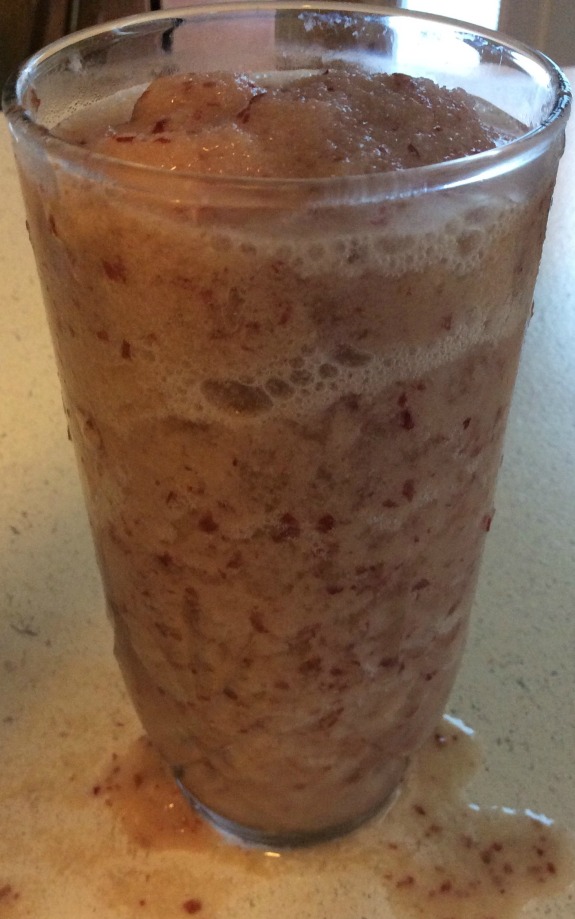
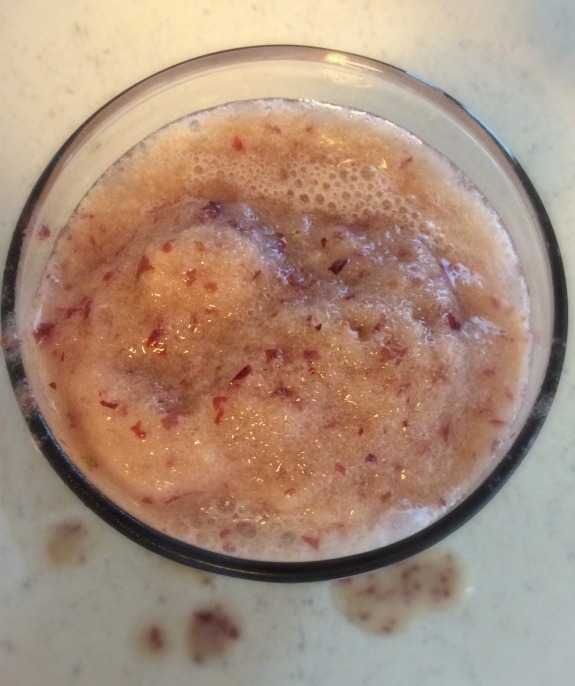
Creamy Chocolate-Banana Smoothie (Dairy-Free)—Taste and See

The banana, avocado, coconut milk and almond butter provide a creamy texture without the use of dairy (although you can definitely use dairy if you’d like). And the chocolate and honey make it taste amazing. This dessert-type smoothie is perfect for an after-dinner treat.

Creamy Chocolate-Banana Smoothie (Dairy-Free)—Taste and See

Creamy Chocolate-Banana Smoothie
(Makes 2 servings)

  • 1 frozen banana, extra-ripe
  • 1/2 avocado
  • 1 1/2 cups milk of choice (I like to use homemade coconut milk)
  • 2 Tbsp almond butter (or nut butter of choice)
  • 2 Tbsp unsweetened cocoa powder
  • 2 Tbsp raw honey (more or less to taste)
  • dash of sea salt
  • 4-6 ice cubes

Combine all ingredients in blender and blend until smooth.

Enjoy!

Looking for a breakfast smoothie? Give this green breakfast smoothie a try!

This post was shared at Homestead Barn Hop, Mostly Homemade Mondays, Natural Living Monday, Thank Goodness It’s Monday, What’d You Do This Weekend, Anti-Procrastination Tuesday, Fat Tuesday, Gluten-Free and DIY Tuesday, Healthy Tuesday, Naturally Sweet TuesdayTotally Talented Tuesdays, Allergy Free Wednesday, Gluten-Free Wednesdays, Real Food Wednesday, Waste Not Want Not, Wellness Wednesday, Full Plate Thursday, Pennywise Platter Thursday, Simple Lives Thursday, Thank Your Body Thursday, The HomeAcre Hop, Fight Back Friday, Gluten Free Fridays, Let’s Get Real, Natural Family Friday, Real Food Fridays, Unprocessed Fridays, Savoring Saturdays

Summertime Taco Salad

Salads are one of my favorite meals to eat. I love how light they are and it’s a great way to get in lots of vegetables. My salad craving is especially strong  during the summer when there’s gobs of produce everywhere.

But my husband isn’t a fan of salads. We’ve tried a few different things, but it’s usually a no-go.

So you can imagine my excitement when I discovered that he will eat taco salad.

Taco Salad—Taste and See

Needless to say, almost every week or so over the past month, we’ve been having taco salad for dinner. Not only is it tasty, but it’s very simple to put together.

Taco Salad—Taste and See

This salad can be easily tailored to fit what you like. I like a big bowl with lots of greens, a variety of vegetables, meat, and a simple homemade dressing (actually it’s usually just olive oil and lemon juice) sprinkled on top. Josh likes a plate with some lettuce, a few select vegetables, meat and cheese on top with no dressing. So make it your own. I’ve included an outline below that can be easily adjusted to fit any and all preferences.

Taco Salad—Taste and See

Doesn’t it just make your mouth water?

Enjoy!

Summertime Taco Salad
(3-4 servings)

  • 1 lb ground meat (I like beef or turkey)
  • Homemade taco seasoning (I like this recipe)
  • Romaine lettuce, chopped
  • Diced tomato
  • Diced avocado

Optional:

  • Diced bell pepper
  • Green onion
  • Black olives
  • Shredded zucchini
  • Salsa
  • Guacamole (in place of avocado)
  • Refried beans (omit for Paleo and GAPS)
  • Shredded cheese (omit for dairy-free)
  • Sour cream (omit for dairy-free)
  • Favorite homemade dressing (I usually just add extra-virgin olive oil and a splash of lemon juice—the seasonings flavor it so well that it doesn’t need much).

Cook ground meat in skillet over medium heat. Once thoroughly cooked, drain and place back in the skillet. Add taco seasoning and filtered water (somewhere between 1/2 to 1 cup) and simmer over low heat to warm mixture. Meanwhile, wash romaine lettuce and chop or tear into bite-size pieces. Place desired amount of lettuce in each dish and add diced tomatoes and avocado (and any other toppings). Top with warm meat mixture (and dressing, optional).

Have a favorite salad? Please share!

This post was shared at Homestead Barn Hop, Mostly Homemade Mondays, Natural Living Monday, Thank Goodness It’s Monday, What’d You Do This Weekend, Anti-Procrastination Tuesday, Fat Tuesday, Gluten-Free and DIY Tuesday, Healthy Tuesday, Totally Talented Tuesdays, Allergy Free Wednesday, Gluten-Free Wednesdays, Real Food Wednesday, Waste Not Want Not, Wellness Wednesday, Full Plate Thursday, Pennywise Platter Thursday, Simple Lives Thursday, Thank Your Body Thursday, The HomeAcre Hop, Fight Back Friday, Gluten Free Fridays, Let’s Get Real, Natural Family Friday, Real Food Fridays, Unprocessed Fridays, Savoring Saturdays

The View From Here: June

June has left me feeling a bit more tired than normal. It’s not from the (extremely) hot weather, although that probably factored into the equation some. No, it was this little guy.

View From Here_June

Yep, this little man has decided to go straight from nothing to standing up, skipping the crawling phase entirely. Almost as soon as he started crawling, he started climbing. And oh my…when he’s awake, it seems like he’s non-stop, always on the move. Which means I have to be on the move. And put other things on hold. And then the other things begin piling up…and piling up…

View From Here_June 2

But I wouldn’t trade it for anything in the world.

And this kitchen-friend has been more exhausted this month too. Between all the coconut milk and gobs of cold smoothies and drinks I’ve been making (like this one and this one), it hasn’t really gotten a chance to slow down.

View From Here_June 3

One other noteworthy item for June is the Savor the Taste of Summer Blogger Challenge and Giveaway that I’m participating in. The purpose of the challenge is for bloggers to display their best summer-food recipes, tips, and articles, and then for readers to vote on their favorite. I felt like this was a really beneficial event in a few ways: 1) It’s nice to find new ways to use seasonal food; 2) I enjoyed discovering and viewing the blogs of the other participants; and 3) There is a pretty sweet giveaway for you guys (and all you have to do is vote for your favorite to be entered into the drawing). So if you haven’t already, check it out. It’s still live until July 4th.

Savor_the_Taste_of_Summer-2 copy


Favorite New Recipe: I have two of them to share this month. The first is this Chop and Drop Roasted Veggies and Sausage from “Paleo Newbie.” It is such a delicious and easy meal to put together and I love how versatile it is. I’ve fixed it a few times this month already and haven’t fixed it the same way twice (substituting and adjusting based on what I have on-hand). It’s a win at our house. And the second are these N’oatmeal Creme Pies from “He won’t know it’s paleo.” They. are. AMAZING. But not just because they taste wonderful (I assure you, they do), but they are also AIP friendly (AIP is an elimination diet geared toward those with various autoimmune diseases—check out this link for more information.) They are free of grain, nuts, dairy, eggs and soy. AND they are good.

Frugal Change: Purchasing a water filter. This is actually something we did a few months ago, but it’s still helping us save money now. The initial investment was a little tough, but the money that it saves over time is really worth it. I use it in cooking, cleaning produce, and some drinking (I struggle with the taste some so I still do the fill-up jugs of reverse-osmosis water from the store. I’m hoping to get a Berkey filter for our drinking water—but that’s a post for another day.) Overall, this is still a money-saver.

How has your month been?

Savor the Taste of Summer—Blogger Challenge and Cash Giveaway

Savor the Taste of Summer

Blogger Challenge & $100 Cash Giveaway!

Today is the first day of summer. And what better way to celebrate than with food? I’m excited to introduce the Savor the Taste of Summer Blogger Challenge and Cash Giveaway!

So what’s this all about? Several bloggers (including myself) have teamed up and compiled their very best summer-inspired articles and recipes showcasing summer in-season food. You’ll see the entire collection below.

And what’s in it for you? We are asking you to vote for your favorite post and you will automatically be entered to win $100 cash! The drawing will take place on July 5th.

So what do you do to enter? First, click on the Savor the Taste of Summer submissions link (2nd link below) to view all the submissions. Once you’ve chosen your favorite, click on the Rafflecopter link (1st link below) and follow the instructions to submit your vote and be entered into the giveaway.


Enter to win $100 cash via PayPal

Click the link below and complete the tasks to earn entries into this giveaway. The more you complete, the greater your chance at winning!

Open Worldwide.
Ends at 11:59pm EDT on July 4th, 2014.

Click link below to vote and enter giveaway:
a Rafflecopter giveaway

Click link below to view Savor the Taste of Summer submissions

Attention Bloggers!!

Interested in participating in our Fall Blogger Event and Giveaway? Send an email to dchealthybites (at) gmail (dot) com and you will be sent all the details. Space is limited so don’t miss out!

Grape Slushy

When I think of summer, I think of a lot of things, but one of the top that comes to mind are cold treats. Ice cream, smoothies, snow cones—these are perfect for a really hot day.

I remember when I was little, on certain days during the summer, a white truck with really loud music would slowly chug down the road in our neighborhood. And everyone knew what that meant—SLUSHIES! We would flag the truck down, give him our money and in return, get our choice among the available flavors.

Even if you didn’t have the slushy coming to your doorstep like I did, you still don’t have to go very far to find them. Sporting events, convenience stores…they are everywhere, and especially during this extremely warm season.

But unfortunately, most slushies (like many other cold treats that are out and about) are just not healthy. High fructose corn syrup, sugar and preservatives are a few of the culprits that make these worth skipping. But on a brighter note, slushies are very easy to make at home. As long as you have access to a blender (I think even a food processor would work), then you can whip one of these up in no time.

I chose to make a grape-flavored slushy mainly because grapes are my favorite summer fruit. But you can experiment with other fruits such as watermelon, strawberry, mango or even a fruit combo. Just be sure to adjust the amount of ice (some fruits are more liquidy than others so more or less may be needed).

Grapes (which are actually considered a berry) contain many nutrients and minerals, including Vitamins C, K and A, potassium, iron, copper and manganese. Additionally, they are full of antioxidants, loaded with enzymes and high in water content (which is helpful for hydration). It’s safe to say that these little guys are pretty nutritious.

Even if that doesn’t convince you, I’m pretty sure the pictures will. So without further ado, let me introduce the delicious grape slushy.

Grape Slushy

Grape Slushy 1

Grape Slushy 2

I only have two words of caution: Brain.freeze.

Enjoy!

Grape Slushy
(makes 2 servings)

1 cup red grapes
1/2 cup coconut milk
2 to 2 1/2 cups of ice (roughly 11-12 ice cubes from standard ice tray)

Place grapes and coconut milk in blender and blend until smooth. Add in ice and continue blending to desired consistency.

What’s your favorite summertime fruit?

Sources and further reading on health benefits of grapes:
http://www.webmd.com/diet/features/8-healthy-facts-about-grapes
http://www.livestrong.com/article/509099-nutrition-benefits-of-red-grapes/
http://www.medicalnewstoday.com/articles/271156.php
Nourishing Traditions by Sally Fallon (p 47)

This post was shared at Homestead Barn Hop, Mostly Homemade Mondays, Natural Living Monday, Thank Goodness It’s Monday, What’d You Do This Weekend, Anti-Procrastination Tuesday, Fat Tuesday, Gluten-Free and DIY Tuesday, Healthy Tuesday, Naturally Sweet TuesdayTotally Talented Tuesdays, AIP Recipe Roundtable, Allergy Free Wednesday, Gluten-Free Wednesdays, Real Food Wednesday, Waste Not Want Not, Wellness Wednesday, Full Plate Thursday, Pennywise Platter Thursday, Simple Lives Thursday, Thank Your Body Thursday, The HomeAcre Hop, Fight Back Friday, Gluten Free Fridays, Let’s Get Real, Natural Family Friday, Real Food Fridays, Unprocessed Fridays, Savoring Saturdays

Homemade Coconut Milk

When I first eliminated dairy from my diet several years ago in order to manage some health problems that had crept up, and soon after this starting the GAPS diet, I pretty much avoided anything with milk (any kind of milk—dairy or non-dairy). Then a year or so in, I began tinkering with canned coconut milk for smoothies and ice cream and got really good results. But I still didn’t use it for anything else, mainly because I didn’t like having to open a can every time I needed a small amount of milk for a recipe.

Coconut Milk

Around this time, I tried once to make my own coconut milk. It didn’t turn out so well (a total flop), so I just gave it up and kept using the canned coconut milk here and there. Looking back, I realize I should have given it another go because it’s really quite easy and cheaper than buying canned coconut milk.

Now, I will insert here that I still like using canned coconut milk for certain things because the consistency is a bit thicker (more creamy), which works better for things like ice cream. But the homemade version is perfect to use in any recipe that requires milk and I love it in smoothies as well.

So what are the benefits of making your own? Like I mentioned above, the biggest benefit is that it’s cheaper. Secondly, you can avoid any additives that are included in many canned coconut milk brands.

And even if you still consume regular dairy, using coconut milk as a substitute every now and then is a good way to get more coconut in your diet (more on the health benefits of coconut coming soon!).

All you need to get started is 1 cup of unsweetened shredded coconut flakes, filtered water, and a blender. That’s it! Directions are listed below.

In the coming weeks, I’ll be sharing lots of ways to use this kind of milk. But you probably don’t need any help with that…

Homemade Coconut Milk
(makes approximately 4 cups)

1 cup unsweetened shredded coconut
4 cups filtered water

Combine ingredients in a blender and allow to soak for 2-3 hours (optional—can omit if time doesn’t permit). Blend on high for several minutes (usually at least 4-5). Stop in between to scrap down the sides and test consistency. When finished, strain milk through a fine sieve; discard remaining pulp (or you can dehydrate this pulp to make coconut flour). Store milk in refrigerator and use within 4-5 days.

What is your favorite way to use coconut milk?

This post was shared at Homestead Barn Hop, Mostly Homemade Mondays, Natural Living Monday, Thank Goodness It’s Monday, What’d You Do This Weekend, Anti-Procrastination Tuesday, Fat Tuesday, Gluten-Free and DIY Tuesday, Healthy Tuesday, Totally Talented Tuesdays, AIP Recipe RoundtableAllergy Free Wednesday, Gluten-Free Wednesdays, Real Food Wednesday, Waste Not Want Not, Wellness Wednesday, Full Plate Thursday, Pennywise Platter Thursday, Simple Lives Thursday, Thank Your Body Thursday, The HomeAcre Hop, Fight Back Friday, Gluten Free Fridays, Natural Family Friday, Real Food Fridays, Simple Meals Friday, Unprocessed Fridays, Savoring Saturdays

Garlic Thyme Turkey Sausage

Sausage is a favorite breakfast food around our house. It goes well with almost everything—and it’s really quick to cook up. But we don’t use just any sausage. Many that are sold in the store are filled with additional ingredients and aren’t made with high-quality meat. This is why I like to make my own or purchase it from local farms.

Garlic Thyme Turkey Sausage

Fortunately, making your own is really easy and is oftentimes cheaper anyway (win-win!). And the possibilities are endless! This turkey sausage has become an easy snack for us in addition to a breakfast favorite. When my husband gets home from work, he is usually hungry and needs something easy to grab. I’ll cook a batch of these and store in the fridge, so when either of us wants a quick source of protein, these are ready to go. Of course, they don’t last too long…

Garlic Thyme Turkey Sausage 2

This isn’t a spicy sausage, but the garlic and thyme provide a very distinct (and delicious) flavor that complements the turkey well. I normally use dried thyme but you could always substitute fresh thyme if you have it on hand.

Garlic Thyme Turkey Sausage 3

Enjoy this savory snack!

Garlic Thyme Turkey Sausage
(Makes 12-18 sausages, depending on size)

1 lb ground turkey (preferably free-range or pastured)
1 tsp raw honey
1 tsp sea salt
1 tsp dried thyme
1 Tbsp dried sage
2 cloves garlic, minced
Pepper to taste

Place all ingredients in a bowl and combine well. In a greased skillet, spoon out the mixture in small patties, flattening and shaping with spoon as needed. Cook over medium heat and flip midway through for even cooking. Remove from heat once thoroughly cooked.

Have a favorite homemade sausage recipe? Please share!


This post was shared at Homestead Barn Hop, Mostly Homemade Mondays, Natural Living Monday, Thank Goodness It’s Monday, What’d You Do This Weekend, Anti-Procrastination Tuesday, Fat Tuesday, Gluten-Free and DIY Tuesday, Healthy Tuesday, Naturally Sweet Tuesday, Totally Talented Tuesdays, AIP Recipe Roundtable, Allergy Free Wednesday, Gluten-Free Wednesdays, Real Food Wednesday, Waste Not Want Not, Wellness Wednesday, Full Plate Thursday, Pennywise Platter Thursday, Simple Lives Thursday, Thank Your Body Thursday, The HomeAcre Hop, Fight Back Friday, Gluten Free Fridays, Natural Family Friday, Real Food Fridays, Simple Meals Friday, Unprocessed Fridays, Savoring Saturdays

Three-Ingredient Banana Nut Bites

So I was having one of those days where I wanted a quick snack that wasn’t too sweet but still tasted good and was already set to eat (but not processed—i.e., out of a bag or box). That’s not asking much, right? Well, I’m happy to say there is such a snack—it wasn’t already prepared but was so quick and easy that it felt like no time at all.

Banana Nut Bites 2

These delicious cookies are made up of banana, nut and/or seed butter and a bit of baking soda. That’s it. Of course, you can dress them up by adding chocolate chips, coconut shreds, dried fruit, etc., but they are delicious with or without additions. The cookies have a slightly sweet, nutty flavor that are easy to gobble up.

Banana Nut Bites 1

You can use any nut or seed butter that you feel comfortable with. (I normally use sunflower seed butter or peanut butter or a combination of the two.) And if you’d like something a little sweeter, you could always add a little honey or even increase the amount of banana.

Banana Nut Bites3

Delicious bite-size goodness!

Banana Nut Bites

(Makes between 20-24 bite-size cookies)

2 medium bananas, extra ripe (lots of brown spots)
1 cup nut or seed butter
1/4 tsp baking soda
honey or other sweetener to taste (optional—I usually omit)
Optional add-ins: chocolate chips, coconut shreds, dried fruit

In a small bowl, mash banana until smooth. Add in nut butter and baking soda and stir thoroughly. Roll in any optional ingredients (chocolate chips, coconut shreds, etc). Spoon out batter (about a tablespoon or so for each cookie) on a greased or parchment-lined baking sheet. Bake at 350 degrees for 12-15 minutes, until the tops are slightly browned.


This post was shared at Homestead Barn Hop, Mostly Homemade Mondays, Natural Living Monday, Thank Goodness It’s Monday, What’d You Do This Weekend, Anti-Procrastination Tuesday, Fat Tuesday, Gluten-Free and DIY Tuesday, Healthy Tuesday, Naturally Sweet Tuesday, Totally Talented Tuesdays, Allergy Free Wednesday, Gluten-Free Wednesdays, Real Food Wednesday, Waste Not Want Not, Wellness Wednesday, Full Plate Thursday, Pennywise Platter Thursday, Simple Lives Thursday, Thank Your Body Thursday, The HomeAcre Hop, Fight Back Friday, Gluten Free Fridays, Natural Family Friday, Real Food Fridays, Simple Meals Friday, Unprocessed Fridays, Savoring Saturdays

The View From Here: May

May has been full of sunshine and warm weather here, perfect for walking outdoors. We’ve had a few of the really hot days that will become the norm later this summer, so we are soaking up the mildish warm weather while we can.

View From Here-May 1

Now that Josh is out of school (as I mentioned here), we’ve been trying to catch up on some projects around the house (okay, maybe just one project—unpacking!) One of the annoying things about moving is that the boxes never seem to go away. But I think this really is the last of them. It feels good to be somewhat more settled. Now if we could just make everything fit…

View From Here-May 3

Budgeting has also been on our radar this month. We’ve been looking for ways to really stretch our income without compromising on some of the things we are committed to (such as high-quality food sources). It’s a challenge to say the least, but budgeting/analyzing our costs (as much as I didn’t want to do it) has been very beneficial. I’ve been able to monitor and keep tabs on exactly where our money is being spent and look for ways we can cut back. Hopefully I’ll be able to share more about this in the coming months.

View From Here-May 4

Favorite New Recipe: While I am currently on a grain-free diet, my husband is not. But we still do our best to make sure the grains he eats are prepared for optimal digestion (think traditional methods like soaking, sprouting, etc). I made these gluten-free Soaked Granola Muffins for his breakfast one week and they were pretty amazing (yes, I did try one…or two…). By soaking the oats overnight, the antinutrients are broken down for easier assimilation and absorption (check out this article for more information on traditional preparation of grains).

Frugal Change: We started cutting my husband’s hair here at home. It’s pretty easy because he keeps it short. We’ve talked about doing it for a while but finally pulled the trigger this month.

I’d love to hear how your month was or any new recipes or changes you’ve made. Please feel free to share!

Baked Sweet Potato Fries

So, I have to say our Memorial Day weekend is off to a great start. Our seven-month- old son has been sick with a cold this week and he hasn’t gotten much sleep (which by default means I haven’t either!). But I’m happy to say that he’s feeling better and slept the entire night—win-win!

sweet potato fries 4

I wanted to share a side dish that has become a staple in our house. These tasty fries usually find their way to our table at least a few times each week and for good reason. First, they are delicious. Second, they are super easy to make. Third, it’s way cheaper and healthier than buying them from the store (no added ingredients or inferior oils). And fourth, they are delicious (okay, that needed to be said again).

sweet potato fries 3

I almost didn’t share this recipe, because I figured everyone already knows how to do this (and if you haven’t done it before, you’d be able to figure it out). But to be honest, I only started eating sweet potatoes this way within the last several months. So, I thought it wouldn’t hurt to throw this out there for anyone who hasn’t made sweet potato fries (or regular potato fries if you aren’t a fan of sweet potatoes like my husband).

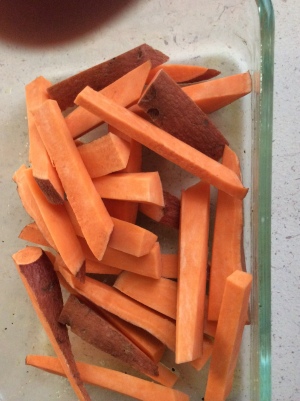
Just cut the sweet potato into fry-shapes:

sweet potato fries 1

Coat with a little olive oil (or softened coconut oil), sea salt, and fresh-ground pepper, and spread out on a pan (I like to line the pan with parchment paper for easier clean-up):

sweet potato fries 2

Bake at 350 for somewhere between 20 and 30 minutes. You can flip them midway through the bake time, but I usually just leave them (because I’m a bit lazy). And that’s it!

Baked Sweet Potato Fries
2 sweet potatoes
2 Tbsp olive oil or softened coconut oil (more or less to taste)
Sea salt
Fresh-ground pepper

Cut sweet potatoes into fry-slices. Place in a dish and add olive oil, sea salt and pepper. Coat all pieces thoroughly, and then lay flat on baking pan (I like to line with parchment paper, optional). Bake at 350 degrees for 20 to 30 minutes. Flip midway through the bake time (optional).

What’s your favorite way to eat sweet potatoes?


This post was shared at Homestead Barn HopMostly Homemade Mondays, Natural Living Monday, Thank Goodness It’s Monday, What’d You Do This Weekend, Anti-Procrastination TuesdayFat Tuesday, Gluten-Free and DIY TuesdayHealthy Tuesday, Naturally Sweet TuesdayTotally Talented Tuesdays, AIP Recipe RoundtableAllergy Free Wednesday, Gluten-Free Wednesdays, Real Food Wednesday, Waste Not Want Not, Wellness Wednesday, Full Plate Thursday, Pennywise Platter ThursdaySimple Lives Thursday, Thank Your Body Thursday, The HomeAcre Hop, Fight Back FridayGluten Free Fridays, Natural Family FridayReal Food Fridays, Simple Meals FridayUnprocessed FridaysSavoring Saturdays